Showing posts with label Dinner. Show all posts

Wednesday, July 31, 2013

Zesty Summer Chicken

I bought a microplane this week, and I got to use it today! It was a banner day! I don't know what that expression means, but it sounds like something exciting.  Just like using my microplane for the first time.

Today's inspiration comes from my favourite food magazine, the LCBO's Food & Drink magazine. They have the BEST recipes.  This one was originally for grilled spatchcock chicken, but I don't have a barbecue right now, and I had defrosted chicken breasts... so I just used the marinade since it sounded amazing.

Zesty Summer Chicken
from the LCBO Food & Drink Summer 2013 issue
2 tsp lemon zest
1/4 cup finely chopped fresh parsley
1-2 Tbsp lemon juice (I used half a small lemon)
1 tsp smoked paprika
1/4 cup olive oil
1 tsp salt
chicken breasts (2-4)
  1. In a large enough dish, mix together lemon zest, juice, parsley, paprika, oil and salt.
  2. Dredge chicken through the marinade, coating both sides.
  3. Cover and refrigerate 2-4 hours.
  4. Heat ~1 Tbsp oil in a large frying pan, and cook the chicken breasts, turning one and testing to see if cooked through before serving.
  5. Alternately - grill on the barbecue, I bet it would be delicious!

Thursday, May 30, 2013

Gazpacho

As a kid, I always hated when my mum would make gaspacho. I didn't like cucumber, and I HATED raw tomatoes.  Now that I've grown up, well at least taller, I've come to love tomatoes, and I have a healthy respect for fresh cucumber (although we're still not best friends).

I went to the Taste of the Food Terminal in Toronto this past weekend, and I came home with a ridiculous amount of fresh fruits and veg. Including 3 cucumbers.  I still don't love cucumbers, but I sure couldn't let them go to waste.  I asked around, and several people (my mum included) suggested I make gazpacho.  So I did.


For those who don't know, gazpacho is a cold soup which is Spanish in origin.  It's main ingredients are tomatoes, (bell) peppers, cucumber and onion, and a brief survey of recipes online show many, many possible additions to those base ingredients.

This recipe is based on my mums, in that it is hers, but it's one of those frustrating recipes where you add "enough" of each ingredient.  I've tried to make it as straightforward as possible.

Gazpacho
1 can no salt added diced tomatoes
3 small brown onions
1 red pepper
1 1/2 cucumber
2 large handfuls baby carrots (~1 - 1 1/2 cups)
2 cloves garlic
2 Tbsp fresh parsley
1 Tbsp fresh basil
1 Tbsp sugar
salt & pepper, to taste 

  1. Peel and coarsely chop onion and garlic, coarsely chop red pepper and carrots. Toss into a food processor. (If you don't have a food processor, I suggest you borrow one, it needs to be finely chopped).
  2. Peel and seed cucumber, coarsely chop and add to food processor.
  3. Throw in canned tomatoes, herbs and sugar.
  4. Pulse all ingredients in food processor until finely chopped.  It should appear somewhat liquidy, but not pureed.
  5. Add a small amount of salt and pepper, to taste.
  6. Transfer to a large bowl, cover with saran and refrigerate for a few hours to allow flavours to combine.  You want the saran wrap to sit on the surface of the soup, to avoid exposure to air which can cause discolouration.
  7. Serve cold, especially on a hot day.  Add salt and pepper to taste when serving.

This recipe makes enough to feed a small army, but on the upside it keeps well in the fridge for up to a week.  I've heard mixed responses online as to whether this can be frozen or not.  It depends on how smoothly you blend the soup, I would imagine.

Tuesday, May 14, 2013

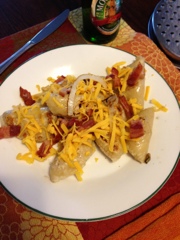
Potato Cheddar Perogies

I asked my friend last weekend what I should do as my cooking adventure this week. She said "perogies!".  Challenge accepted.
It was a brilliant idea.


Perogies are a favourite guilty pleasure of mine.  I say guilty because they're served with cheese and bacon on top and sour cream on the side.  Not very healthy, but definitely very tasty.

Friendly warning however, this took me a little over 3 hours.  It wasn't difficult, it was just a long process. I started by making the filling, and let it sit on the counter to cool down while I made the dough.   Also -- you really really want to get a dough press for this. You can buy them at the dollar store. It's inexpensive and super useful if you're ever going to make dumplings, or ravioli, or even fancy finger sandwiches.  My mum happened to mention that she had one last week so I traded yard work for the use of her dough press to make these.  I really dislike yardwork.


Potato Cheddar Perogies
(from Canadian Living)
Dough
3 cups all-purpose flour
1 tsp salt
1 egg
3/4 cup water
2 Tbsp vegetable oil
Filling
1 lb potatoes, peeled and cubed (about 2-3 large potatoes)
2 Tbsp butter
1/3 cup finely chopped or grated onion
1/2 cup shredded cheddar cheese
1/4 tsp salt
1/4 tsp pepper
Topping
1/2 - 1 large onion, sliced and separated into rings for sauteeing
1/2 - 3/4 cup shredded cheddar cheese
6-8 pieces bacon, cooked and crumbled (optional)
sour cream
  1. Fill a medium pot with cold water, add salt and potatoes. Bring to boil.
  2. In a medium frying pan, melt butter then add onions. Fry until golden and tender
  3. Boil potatoes for 10-15 minutes or until tender.
  4. Drain and transfer to a large bowl, mash well.
  5. Add onions, grated cheese, salt and pepper.
  6. Stir to combine, then set aside.
  7. In a mixing bowl, combine flour and salt.
  8. In a separate bowl, whisk together oil, egg and water.
  9. Gradually add wet ingredients to flour and mix to combine.
  10. If needed, add 1-2 Tbsp more water to bring the dough together.  It should be soft but not sticky.
  11. Turn out onto a floured surface and knead for 10 minutes, or using dough hook, beat in mixer for about 7 minutes.
  12. Separate dough into two balls. Cover with plastic wrap or a damp towel and set aside for 20 minutes. 
  13. This is a great time to pour a glass of wine, or do some dishes. 
  14. On a lightly floured surface, turn out dough, one ball at a time and roll to be ~1/4" thick.  
  15. Using dough press or cookie cutter, you want circles approximately 3" in diameter.
  16. If you're using a dough press, put the circle on the open face, pressing firmly against the "crimping" edge.  
  17. Add about 1 tsp of filling, then wet the edges of the dough circle to help them stick. Fold in half, pressing firmly to seal. Repeat.  Re roll scraps to make the most of your dough.
  18. Set finished perogies on a baking tray or lightly floured surface and cover with a dish towel.
  19. This recipe makes 24-36 perogies, so any that you aren't planning on eating tonight, can be put into the freezer on a baking tray overnight, then transferred to a Ziplog freezer bag.
  20. Fill a large pot with salted water, bring to a boil.
  21. In batches, gently drop uncooked perogies into boiling water.
  22. Remove the perogies when they float to the surface (~5 minutes).  Allow to drain.
  23. Heat oil in a large frying pan. Sautee onion rings for topping.
  24. When onions are clear and soft (8 minutes), set aside.  Add drained, boiled perogies to pan.
  25. Turn after about 5 minutes, to get them golden brown on either side.
  26. Serve topped with sauteed onion, crumbled bacon, grated cheese and sour cream.
  27. To prepare frozen perogies, boil from frozen (will take ~10 minutes), then fry.


These perogies were fantastic, but they're definitely a special occasion treat.  They took an entire afternoon to make.  I haven't tried the frozen leftovers yet, but the fresh ones were better than the frozen ones you can find in the grocery store.


Monday, November 5, 2012

Vegetarian Egg Casserole

So it's Meat Free Monday again! And again I dropped the ball on being prepared.  I was planning to make quiche, but then I found out that the puff pastry that was in the freezer needs two hours to defrost, and I didn't think that far ahead.  So, improvisation abounds! I decided to take the ingredients and make an egg casserole.


Fun fact, do you know that in Canada milk comes in bags?  Apparently this is only a Canadian thing. Oh, and I moved to Canada (which is at least part of the excuse I'm using for not updating for months).


Vegetarian Egg Casserole
Adapted from: http://www.kraftrecipes.com/recipes/quick-easy-egg-casserole-66050.aspx
1/3 of a baguette (or 3-4 slices of bread), cubed
4 eggs
1 1/3 cup milk
~1 cup grated cheese (marble cheese is delicious)*
3 handfuls cherry tomatoes, halved or quartered
1 medium onion, chopped
4 large field mushrooms, sliced
1/2 tsp cayenne
1/4 tsp nutmeg
1 tsp mustard seeds
a splash of balsamic vinegar
salt
olive oil


  1. Preheat oven to 350F/175C.
  2. Using cooking spray or oil, lightly grease a 9x9" casserole dish
  3. Spread cubed bread in an even layer across the bottom of the casserole dish
  4. Meanwhile, heat a small amount of oil in a frying pan over medium heat.
  5. Add onions and fry until starting to clear, add mushrooms and soften.  
  6. Throw in tomatoes and add a splash of balsamic and a pinch of salt.  Let cook 3-5 minutes on medium heat.
  7. Spread sauteed vegetables on top of bread, top with cheese. 
  8. Add as much cheese as you like.  The best cheese for egg casseroles or quiches is gruyere, in my opinion, but I used marble cheese instead because it's much cheaper, and I had it on hand.
  9. In a medium size bowl, whisk together 4 eggs, 1 1/3 cup milk and spices.  You can use any spices you like, these are just a guideline.
  10. Pour egg mixture over bread/vegetable/cheese mixture.
  11. Bake for 40 minutes or until golden on top (or cooked through).
  12. Let sit for a few minutes to cool, then enjoy!


Serve with your preferences of ketchup, bbq sauce or chili sauce.


Substitutions -- you could add ham, bacon or sausage meat if you crave meat.  Other vegetable choices could include spinach (cook for 30 seconds or so), cooked pumpkin/squash, garlic, broccoli, etc.

Thursday, July 12, 2012

Buffalo Chicken Wraps

So I was talking to someone the other day, and they asked me why they're called 'Buffalo chicken wings', or why it's called 'Buffalo' seasoning. I totally made up my answer and said it was because that's how fresh buffalo tastes. Yes, because buffalo tastes like a chicken wing ^_^.  On a foodblog quest of epic procrastination today during lunch, I discovered that Buffalo flavouring comes from Buffalo Chicken Wings which were from Buffalo, New York, according to Wikipedia.

I have a secret weakness for Buffalo chicken tender wraps. It's one of my favourite foods in the world.  Almost every recipe I've looked at online calls for either Frank's Red Hot sauce, or 'buffalo sauce'.  And I have a bit of a peeve for recipes that call for specific sauces, because, you know, brands are not universal.  Turns out, Franks Red Hot is actually a cayenne based hot pepper sauce, so if you can't find that particular brand (and it is a good brand, widely available across North America), you can look for a substitute. That's what I did.

OR... a suitable cayenne pepper sauce substitute, I found Byron Bay Chilli Co. Cayenne Chilli Sauce with Lime. It's delicious!
Buffalo Chicken Wraps
modified from: August/September 2005 Eating Well: Buffalo Chicken Wraps
10 chicken tenders
3 T white vinegar
2 T cayenne pepper sauce (e.g. Franks Red Hot)
1/4 t cayenne powder
2-3 T light mayonnaise
2-3 T greek yogurt
1/4 - 1/2 cup blue cheese, crumbled
1 green onion
1 tomato
1/2 red pepper
handful lettuce
wraps
salt and pepper
oil, for cooking

  1. In a small bowl, crumble blue cheese, stir in greek yogurt, mayonnaise, 1 T of the white vinegar and fresh cracked pepper to taste. Mix well and set aside for 30+ minutes on counter to combine flavours.
  2. In another bowl, combine the remaining 2 T white vinegar with hot sauce and cayenne pepper, feel free to add spiciness to suit your tastes.
  3. Wash, dry and coarsely chop lettuce, tomato, green onion and red pepper.
  4. Heat a swirl of oil to medium-high in a large frying pan, lightly dust tenders with salt and pepper, then fry until golden on the outside: 3-5 minutes per side. If you're unsure, cut open a larger piece and check that there is no pink in the middle. Food poisoning ruins everything.
  5. When chicken is cooked through, remove from heat and drain oil (pat dry with paper towels).
  6. Shred chicken with a knife or with two forks, and dump into a medium-sized mixing bowl. Pour over cayenne sauce mixture and mix well to coat all chicken.
  7. Layer wraps (we used sourdough wraps, yum!) with blue cheese sauce, chicken, green onions, tomato, pepper and lettuce.  Add more hot sauce if desired. Fold and enjoy :D


For tips on folding wraps, check out this simple illustrated guide: http://billgrady.com/wp/2002/11/14/how-to-wrap-a-burrito/

And if you haven't tried Frank's Red Hot... you should. It's one of the top two hot sauces ever made (the other, of course, being Sriracha, and no I don't know which one is better).

Monday, May 28, 2012

Creamy Prawn Pasta

I know blog posts aren't as much fun without photos, but I figure they're still more fun than no posts.  Over the weekend, I dragged poor boyfriend out to Belconnen Fresh Food Markets, which is still not my favourite market in the city, but oh well. Variety is the spice of life.

We decided that it's a shame that we live in Australia and rarely eat prawns, or shrimp, or whatever you want to call them. I've got a good excuse for that though, the really fresh prawns, are sold whole. And that's gross. I strongly dislike having to pinch the heads off and de-vein and de-shell whole prawns. It's gross, and squishy, and icky.  So I don't buy prawn much, since the prawn tails tend to be pre-cooked and I have strong opinions about that too. I've just got opinions out the wazoo. Anywho, we found some raw king prawn tails and bought some and decided to use them in a pasta dish. Yum.

Creamy Prawn Pasta
250 g raw prawn (shrimp) tails
1 tub (250 mL) Philadelphia cream for cooking (or cream)
1 cup cherry tomatoes
bunch fresh basil
2 cloves garlic
half a red onion
half a lemon
pasta (pref. linguine)
Olive oil
Butter (~1/4 cup)

  1. If starting with frozen prawns, defrost them in warm water in the sink, either by running warm (not hot!) water over them in a colander, or by submerging them in a large bowl. If using fresh prawn, rinse in a colander.
  2. Start a large pot of salted water to boil, add pasta when water is boiled and let cook until desired consistency. Meanwhile;
  3. In a small sauce pan, melt butter.
  4. Peel and finely chop garlic and half a red onion, add to pan of melted butter and let sizzle on med-low heat.
  5. Wash and chop 2-3 leaves of basil and add to small sauce pan, stirring to combine all ingredients. I usually 'slap' the basil after I wash it. I don't know that this actually does anything, but it is supposed to release the flavours. To do this, put the rinsed basil in one hand and then clap. It's easy (and fun!).
  6. Meanwhile, wash and quarter cherry onions, then toss with a little olive oil.
  7. Spread tomatoes on a baking tray and broil (top element only) for ~5 minutes at 200C/400F (I used our toaster oven).
  8. In a large frying pan, melt more butter (oh so healthy, I know).
  9. Place prawns in one layer into the frying pan, squirt about 1/4 of a lemon's worth of juice (1-2 T), flip once prawn starts to pink up, after about 3 minutes to a side, and add the rest of the lemon juice.
  10. While prawn is frying, add the cream for cooking, or actual cream to the small sauce pan as well as several more leaves of fresh basil. Stir to combine and set to low heat.
  11. When prawn and tomatoes are ready, pour the cream sauce into the frying pan and mix all ingredients.
  12. Drain pasta and combine with sauce. Enjoy.
I served this in a big bowl with some garlic bread on the side. It was delicious with a sprinkling of parmesan on top. Boyfriend opted to add cracked pepper to his.   
On cream: I love the Philadelphia cream for cooking because it lasts longer in the fridge than regular cream does. I constantly find myself buying thick cream for baking or for adding 1 or 2 T to a dish and then end up throwing out the rest because I don't often cook with cream and it goes bad quickly once opened. The cream for cooking will probably last up to a week in the fridge once opened (maybe more) so it makes more sense, to me.
The sauce for this pasta was fairly runny, which I like.  If you'd prefer a thicker sauce, add 1-2T of flour (or cornstarch I suppose) to the melted butter and garlic in the small sauce pan. Also - for choosing your noodle, personal preference says that Linguine is the best type of noodle for this sauce, but if you don't have any or you don't like linguine, you could substitute a tagliatelle (thicker ribbon cut pasta, often egg noodles) or a fusilli (spirals) for example.

To make this recipe healthier - instead of frying the prawns in butter, use a smaller amount of olive oil and you could substitute some of the cream with milk, although this will guarantee a runnier consistency to the sauce as milk doesn't thicken as well as cream does.

Sunday, April 1, 2012

Easy Pasta Salad

We do meat-free Monday every week, and we get a bit bored of the easy option, which is spaghetti with lots of vegetables, so sometimes we like to try new things.  This week's new thing is... pasta salad. Easy, tasty, and moderately healthy! That's a great choice all around.


Pasta Salad
2 cups pasta (uncooked)
1 red pepper
2 green onions/shallots
1/4 - 1/2 cup italian salad dressing
  1. Cook pasta in salted water until desired level of done-ness (I went for al dente).
  2. Rinse and then finely chop red pepper and green onion.
  3. Drain cooked pasta and tip into a large tupperware dish (or bowl).
  4. Add red pepper and onion, pour in salad dressing and toss to coat. 
  5. Let cool for 10-15 minutes then refrigerate.
  6. Best if refrigerated for several hours or overnight.

I feel like I need one of those Staples buttons. "That was easy!".  We're having this as a side, not sure what to do as a main dish yet.

Also in the kitchen this weekend, we've got banana muffins and sour cream coffee cake. It smells delicious in here!

Saturday, March 24, 2012

Homemade Pizzas

Boyfriend and I found ourselves wandering through the markets this weekend trying to decide what we wanted to make for dinner. We walked past some people chowing down on pizza and decided. Yup. Fancypants pizzas for us!

The great thing about being a the markets, of course, is the wide variety of fresh, cheap and delicious ingredients to choose from. Example: 3 bags of garlic for $4. There will be no vampires in our home any time soon, that's for sure.

Unfortunately, they didn't sell any pizza dough at the markets. Big disappointment. They had premade pizza bases, but apparently we're purists who only want pizza if we get to knead the dough. And by we in this statement I mean he wanted pizza dough so I could knead it. Blarg.

Oh well. I spent a good hour or two looking up recipes for pizza dough once we got home I decided to go with a nice simple recipe from taste.com.au for pizza dough.  It was one of the only ones that actually described how much dough it created (this is a bit of a peeve).  So I have one ball of pizza dough in the freezer and we made two medium sized pizzas.

Pizza Dough
1 1/2 cups warm water
1 7g satchet dried yeast
1/2 t caster sugar
4 cups plain flour
1 tsp salt
4 T olive oil, plus extra


  1. In a medium sized bowl, combine water, yeast and sugar. Stir gently to combine then send aside for ~10 minutes (small bubbles should appear after 10 minutes).
  2. Mix flour and salt in a large bowl, forming well in the centre.
  3. Pour yeast mixture and oil into well, mix to combine with a butter knife.
  4. Turn out onto a lightly flour surface and knead for ~10 minutes or until dough is smooth and elastic.
  5. Return dough to a lightly oiled bowl, turning dough to coat fully.
  6. Cover with plastic wrap and set aside in a warm draft-free area for 30-40 minutes or until doubled size.
  7. When dough has risen, divide into three balls.
  8. Turn out a ball of dough onto a lightly floured surface. Coat your hands lightly in flour and punch the dough to get the air out.
  9. Once air has been punched out of dough, knead the dough into appropriate shape. A rolling pin is helpful here.
  10. Another helpful tactic is to lift the dough up by the sides and let gravity stretch it, then turn the dough and stretch another side. If you're really fancy, you can throw it around like those pizza makers in movies and on TV. Warning: floor pizza does not taste as good.
  11. Any unused dough can be wrapped in plastic wrap and frozen.

Pizza Toppings
Roasted Red Peppers, Roasted Garlic and Roasted Cherry Tomatoes
One Large Red Pepper
One head garlic
6-10 cherry tomatoes.
Olive oil
Salt
  1. Preheat oven to 230C (~475F).
  2. Peel excess skin off of garlic head, keeping cloves together.  Chop off the tips of the cloves.
  3. Put head of garlic in a ramekin or similar small container, pour a glug oil over top of garlic.
  4. Cover with tin foil.
  5. Put garlic on middle rack of oven and bake for 40 to 50 minutes.
  6. Rinse the red pepper and slice in half, removing stem and seeds.
  7. Rub thoroughly with oil.
  8. Place, outside up, on a baking tray covered in baking paper. Slide into the oven with the roasted garlic, as close to the top as possible.
  9. Cook for 10-15 minutes.
  10. When red pepper looks well roasted and skin is slightly blackened, take them out of the oven and transfer to a ziploc bag.
  11. Set aside bag of peppers for about 10 minutes.
  12. Rinse cherry tomatoes and slice in half.
  13. Place on a baking tray, cut side up and sprinkle with salt and olive oil.
  14. Put in oven for 5 minutes.
  15. Meanwhile, remove pepper from bag and peel the skin off.  
  16. Chop as desired and set aside (congrats! You've roasted red peppers).
  17. Remove tomatoes from oven when they look sufficiently roasted
  18. Let garlic sit for 5-10 minutes after removing from oven to cool down.

Once your pizzas are garnished, bake at ~200C for 10 to 15 minutes, or until cheese is melted and crust is looking golden.
For our pizzas, we went a big gourmet.  We picked up a spicy tomato relish to use as our salt base, along with a glug of olive oil and a sprinkle of salt on my pizza.
Boyfriend fried up some grilled sausage meat which he had formed into small balls.  He also had some sliced button mushrooms, roasted garlic, roasted red peppers, roasted tomatoes and finely chopped basil. For cheese, he had sliced baby bocconcini balls and a handful of grated tasty cheese (it's a type of cheddar).
For my pizza, I used some proscuitto, tomatoes, garlic, red peppers and basil.  For cheese, I used the bocconcini balls and some Meffra Garlic Cheddar we found at the markets. I'd never tried it before but it was YUM. I was originally gonna go for a pecorino or similar with the bocconcini, but I'm glad I changed my mind!
Our pizzas turned out freaking DELICIOUS. And the leftovers were awesome for breakfast this morning too!

PS - This was actually last weekend, but then it took me a week to get the photos off of boyfriend's camera.  You know, the ones that are in focus and look nice? The other ones, obviously, are mine.  More baked sweets coming soon.

Friday, March 9, 2012

Mince Meat Pie

I found myself on Thursday night with a bag of defrosted ground beef and no clue what to do with it. I decided to poll my Facebook friends for their advice, and the wonderful Pixie Kat was kind enough to send me a recipe for Shepherd's pie, so between her and this recipe for Shepherd's Pie I found over at taste.com.au, I was set!

So, I began to make my Shepherd's pie, but once I got started I realised I only had two potatoes, clearly not enough to make the necessary mash.  So instead of covering my mince meat filling with mashed potatoes and baking, I covered it with puffy pastry (thanks Jamie Oliver for teaching me another way to be a lazy cook).  It was delicious :)

Mince Meat Pie
~300g ground beef
2 brown onions, chopped
2 large garlic cloves, finely chopped
1 carrot, peeled and chopped
2/3 cup frozen peas
2 cups salt reduced vegetable stock.
1 T salt reduced tomato paste
1 1/2 t Worcestershire sauce

2 T flour
1 t oregano
1/2 t cumin
2 bay leaves
1 sheet puff pastry
olive oil
small bit butter
salt and pepper

  1. In a large sauce pan, cook onion, carrot and garlic with a small glug of olive oil for about 5 minutes.
  2. Add ground beef, breaking up into small bits, cook for 5 more minutes.
  3. Add oregano and flour, and stir until well coated, cooking for an additional 2 minutes.
  4. Add stock (I used 1 cube of veg stock to 2 cups boiling water), bay leaf, cumin,Worchestershire sauce, frozen peas, tomato paste, salt and pepper. Stir to combine all ingredients and simmer on low for 20-30 minutes or until reduced.
  5. Meanwhile, defrost and then roll out puff pastry.
  6. Preheat oven to 190C
  7. Remove bay leaves, then pour mince mixture into a pie dish, top with puff pastry.  Trim edges to puff pastry and poke hole in the middle.
  8. Brush pastry with a small portion melted butter (or olive oil if preferred).
  9. Bake for ~30 minutes on lowest rack of oven, or until pastry is golden.

Best served with ketchup and bbq sauce. Yum.  A vegetarian version could be easily made by swapping out mince meat for chickpeas, potato, or more vegetables (frozen corn is also good).  Makes delicious leftovers (it's really good cold as well as reheated).
To make this a proper Shepherd's Pie instead of a pastry-based pie, simply use 4 or so large potatoes to make mashed potatoes, and spread that over pie in place of pastry and bake for ~20 minutes.  Also good in a deep casserole dish.

PS - I really am a terrible photographer, but I'm blaming it on the fact that we currently have no kitchen lights.

Saturday, February 11, 2012

Baked Onion Rings and Potato Wedges

Here's a funny side to this blogpost - I actually found the recipe for onion rings in the South Beach Diet cookbook.  Don't go getting any funny ideas, I'm not a dieter, but for some reason this cookbook was on sale for $2 so I snatched it up.  The irony being that I find most of the recipes in the cookbook to be too unhealthy for my tastes (salt and oil) - you can tell it's American in origin by many of the ingredients.   Anyways, for a 'healthy' version of a food I love, these onion rings are great! A tiny bit on the dry side, but not enough to be annoying.

Baked Onion Rings and Potato Wedges
Onion Rings
1 Onion (brown or white)
1/2 cup buttermilk
1/2 cup breadcrumbs and/or crushed crackers.
olive oil or cooking spray

Potato Wedges
4 potatoes, washed
salt
paprika
olive oil
chili powder

Onion Rings
  1. Preheat oven to ~200-210C (my cookbook says max... so hotter works too I suppose)
  2. Peel onion and slice into ~0.5-1cm thick rings.
  3. Separate individual rings (I set aside the small inner ones to use later)
  4. Pour buttermilk into shallow bowl and put breadcrumb/cracker mixture into another shallow bowl or on a plate. I use a mix of Premium crackers (like saltines) and store bought breadcrumbs.
  5. Dredge onion rings through butter milk, then coat with breadcrumb mixture.
  6. Place on a cookie tray (I put down wax paper so they don't stick).  
  7. Recipe says to lightly coat in cooking spray. I don't own any cooking spray so I use a bit of olive oil and just lightly brush them.
  8. Bake for ~20 minutes or until golden and tender.
Potato Wedges
  1. Preheat oven to 220C
  2. Slice potatoes into wedges, and toss into a large bowl.
  3. Toss with oil, salt and spices.  Don't use too much oil (a few glugs? I didn't measure, sorry).
  4. Spread out evenly on a baking tray (or two, I used two).  Again, I laid down wax paper first to keep it from sticking.  
  5. Bake for 30-50 minutes or until crispy and brown.  Check after 30 minutes, depending on thickness of slices, they are usually ready around 40 minutes.
  6. Really good with ketchup and Tabasco.
Ideally, with both of these recipes, you would cook them on a silpat or similar, I don't own one of those, so I used wax paper on baking sheets.  I've recently been informed that we should use parchment paper instead of wax paper in baking, so I'll be trying that in the future. 

The recipe for potato wedges can also be applied for sweet potato fries as well. In this case, I'd add some brown sugar and cumin along with the paprika.  Sweet Hungarian paprika is best for sweet potato, while a smoked paprika is better on the potato wedges. It's not a huge difference, however, and I use whatever is handy.

If you are wary of buying buttermilk because you're thinking to yourself 'what the heck am I going to do with the rest of this?'.  Well, it can be used in breading chicken, or you can make Buttermilk Biscuits,  or there are a multitude of other recipes that call for it - why not plan ahead?

I think the next blog post will be pickled vegetables. Either that or the slow cooker chili I plan on making this weekend along with some no-knead bread.

Friday, February 3, 2012

Simple Baked Pork Chops with Tomatoes and Onions

So, on a whim I picked up some pork chops at the grocers this week. I don't actually like pork chops, and as a general rule I don't eat pork, however they were cheap and I'd been discussing them earlier in the week so I gave into temptation.  Of course, then I was faced with the decision of what to do with them. I don't like pork chops, so it would have to be good.

830 on Friday night rolled around and I still hadn't made up my mind so I scoured the internet and most of the recipes for baked pork chops took an hour, and then I found this recipe for Pork Chops with Baked Apples. of course, I only had one apple so this recipe simply wouldn't do, but I decided to take the principle and run with it. I was pretty well satisfied, and the premise can be fairly loosely adjusted to fit whatever you have lying around.

This was so easy, and only took me about 20 minutes in total to prepare.

Simple Baked Pork Chops with Tomatoes and Onions
3 Pork Chops
1 Brown Onion
2 Vine Tomatoes*
Olive Oil
Balsamic Vinegar
~2 T Brown Sugar
Salt & Pepper
Fresh Chives

  1. Preheat oven to 210C (200C fan forced)/400F.
  2. Score fat on the side of the pork chops every 2-3cm.
  3. Sprinkle brown sugar, salt and pepper on both sides of pork chops.
  4. Heat oil in a pan.
  5. Brown pork chops 2-3 minutes per side.
  6. Slice 1 onion into 1/2cm rings (keep together), place in bottom of oven proof dish.
  7. Slice tomatoes into 1/2-1cm slices, place on top of onions.
  8. Sprinkle with fresh chives (fresh rosemary would also be good) and balsamic vinegar.
  9. Place pork chops on top of onions and tomatoes and bake for ~10 minutes.
I served this with steamed frozen peas and corn, a lazy but delicious and well rounded meal. Mashed or baked potatoes would be a good side for this too, if you were so inclined.

Boyfriend claimed the pork chops were a bit tough, but this is what I'm used to. Aren't pork chops always tough? So, perhaps sear them for a shorter period of time.  Either way *I* enjoyed it, and I don't even like pork chops.  I think that in terms of seasoning you could use just about anything, garlic would be a great addition to the bake, or rosemary instead of chives, anything else you have on hand.  I cooked this in a a pyrex pie dish, but the original recipe called for a baking dish without wax paper. I imagine a casserole dish would be great as well. And you can up the recipe as much as you want without adjusting the cooking times as long as the pork chops sit in a single layer in your dish.

Sorry there's no picture of the finished product, but I was hungry!

Enjoy!

PS - Last night, I went to turn on the light over our stove, since the overhead light in the kitchen doesn't work, and it blew the lightbulb AND the fuse for the kitchen.  I found out tonight while searing the pork chops that it also blew the motor on the fan over the stove. Did you know if your pan is sufficiently hot, pork chops will smoke when you sear them?  Yeah.  That was fun.

Thursday, September 29, 2011

Butternut Pumpkin Soup and Rosemary Focaccia

I felt a strange urge today to make bread.  I've only ever tried to make bread twice before and both times were a miserable failure.  The first time, I tried to make a rosemary focaccia from the Barbecue cookbook I mentioned in my post on Spiced Beef Fajitas.  I am sometimes not the greatest at following recipes.  "What the hell is strong flour? I'll just use white flour."  "Ehh... expired dry yeast can't be that bad."  So both of those statements were wrong.   The second time I made bread it was beetroot and cream corn bread. That just explains itself.

I learned today that strong flour aka bread flour is actually quite different than plain flour.  It's got more protein and gluten in it.  It also turns out that my local grocery store does not appreciate my desire to bake bread.  The only regular bread flour they had came in a 5kg bag.  Considering that I was buying other groceries and that I walk home from the store, not to mention how rarely I ever bake bread... I didn't want to buy 5kg, so I ended up in the health/organics aisle buying a 1kg bag of "Organic Egyptian Gold Flour" which was almost the same price.  It was a bit of a frustration.

The pumpkin soup, aka butternut squash soup, I found while reading a story by Ethehunter - she referenced the recipe after describing "Gran's Butternut Squash Soup" in the story.  I tried it and fell in love.

Butternut Pumpkin Soup  from Ethehunter
1 large butternut pumpkin (peeled and chopped)
broth or bouillon (I use veg, she recommends chicken)
2 small red chillies (or 1 jalapeño)
1" fresh ginger, grated
3T brown sugar
salt & pepper
1-2 t cumin
1/2 c heavy cream
queso fresco, sour cream or Greek yoghurt
  1. Put squash, ginger and chilli/jalapeño in a large pot and cover with broth.
  2. Bring to a boil and simmer over medium heat, 20-30 minutes, or until squash is soft.
  3. Let cool and take out the peppers.
  4. Blend soup until smooth.
  5. Add salt and pepper to taste, brown sugar and cumin.  Adjust spices to taste.
  6. Add cream and adjust spice as desired*
  7. Garnish with queso fresco, sour cream or Greek yoghurt.
* If you're making enough for leftovers, don't add the cream to the whole pot, because it makes the soup spoil faster.  This may seem like common sense, but I've made this mistake more than once.
I recommend adding sour cream to this, the Greek yoghurt is OK but not great and... well I have never seen queso fresco at the store so I've never tried it.  A piece of advice for this is to be careful about the use of chillies/jalapeños - I added the two chillies today, but only used half a squash - there was a really spicy afterburn.
I forgot to take a picture before I finished all the soup.  This is while it was cooling, before I put it in the blender.  Half a squash (this much) made two good sized bowls of soup, a whole pumpkin would probably serve four.


Rosemary Focaccia aka Focaccia from Scratchia
from: Go Cook Yourself
500g (3 1/3 cups) strong flour
10g fine sea salt
325 mL warm water
5g Fast Acting Yeast
seas salt
crushed garlic
rosemary
  1. Mix yeast with warm water.
  2. Combine sifted flour and salt in mixing bowl.
  3. Pour yeast water into flour and stir until well mixed.
  4. On well-floured board, knead dough for 12 minutes.
  5. Place kneaded dough in well oiled bowl, cover (with a towel) and let sit for ~1 hour in a warm place.
  6. Move dough to board and beat the air out with fists.
  7. Repeat steps 5 and 6.
  8. Heat oven to 240C.
  9. Roll dough out onto an oiled baking tray (I lightly oiled a piece of wax paper on a baking tray, because I'm finicky).   The recipe says to roll into a rectangle, but I went for 'somewhat oblong' and about 3/4" thick.
  10. Let rise for 30 minutes.
  11. Press into dough to create irregular dimples on the surface.
  12. Spread washed and chopped rosemary, crushed and chopped garlic and coarse sea salt across the surface of the bread.  Drizzle with olive oil.
  13. Bake for 12-15 minutes.
  14. Serve warm, it's delicious.
Dough rising in an oiled bowl.

Preheating the oven, dough is dressed with rosemary, garlic, oil and salt.

The finished product, we sliced up about half of it and dipped it in the soup.

I'm still not sold on the bread, I think I have room for improvement, but boyfriend said he liked it, and so I'll take that as due praise. I guess I just need more practice in bread making.  The wine was delicious though!

Wednesday, September 21, 2011

Cherry Tomato and Bacon Quiche

I love quiche. I think it's because it has cheese in it, and tastes good with bacon. I have probably about 10 recipes for quiche, but they all boil down to two essential recipes. This one is the soft cheese recipe, which normally calls for feta or goats cheese.

Cherry Tomato and Bacon Quiche
4 eggs
1 c milk (wholefat) or cream (1/2 and 1/2)
~4 pieces bacon, cooked and crumbled
1 handful cherry tomatoes, washed and quartered
2 handfuls baby spinach, washed and drained
1 handful fresh parsley, roughly chopped (optional)
1 medium red onion, finely chopped
~80 g blue cheese
1 small handful grated Tasty cheese (mild cheddar or mozzarella is fine)
paprika, cumin, salt and pepper
1 pie shell

Directions

  1. Prepare pie crust per instructions*
  2. Preheat oven to 200C/400F
  3. Cook bacon, drain fat, and crumble when cool
  4. Fry onions until soft, add spinach and parsley and cook until wilted
  5. In bottom of pie shell, put bacon, onion, spinach and tomatoes
  6. Crumble blue cheese on top, then grated cheese
  7. In a large bowl, mix egg, milk and spices (to taste).  Pour over pie shell to cover all ingredients
  8. Bake at 200C/400F for ~45 minutes, or until golden on top and a fork in the centre comes away clean.
* Pie Crust Instructions
Some people like to make pie crust from scratch. That's fabulous. I'm not one of those people. I buy sheets of frozen pastry (shortcrust is best, although I often buy puff pastry because I can' use it more for other things).  When you buy frozen pie shells though, you need to blind bake them so that they retain crispiness.  Most packaging will have instructions, but just incase, here's what I use.  Note: I keep a tupperware container in my pantry full of 'blind baking' rice that I just reuse ever time I'm making pies.
  1. Defrost pasty 10-15 minutes at room temperature
  2. Preheat oven (180 fan/200C)
  3. Lightly grease pie tin
  4. Put pastry in tin, trim excess (I usually roll it out a little bit so it fits nicely)
  5. Put in sheet of baking paper
  6. Fill 2/3 with rice
  7. Bake 10 minutes
  8. Remove rice (here's where you put it in a tupperware container to reuse)
  9. Bake 5-10 minutes
I love quiche, and the great thing about it, is that the recipe can be completely changed. The only "necessary" ingredients are the eggs, milk and cheese, and you can use any kind of cheese you want.  I love putting spinach in my quiches, but other good ingredients include mushrooms, sundried tomatoes,  roasted pumpkin (squash), garlic, leeks, ham and etc. Also, I like to use both cheese (soft and regular cheese), but if you don't want to include the tasty/cheddar/mozzarella cheese, use ~100g (or as much as you like) of a softer cheese like feta or goats milk cheese.

The other trick to making quiche - it calls for cream, it's delicious with cream, I almost never use cream.  If you are brave enough to use a rich cream, it is really reflected well in the flavour of the finished product, however I don't usually have cream in the house, nor do I like using it while cooking, so instead I use what usually ends up being 1% or 2% milk.
I like to serve my quiche with bbq sauces and ketchup, and a small side salad.  It's also delicious cold (or reheated) as leftovers

Sunday, September 11, 2011

Spiced Beef Fajitas with Salsa and Guacamole

I love guacamole, and I love mexican food.  Or faux-mexican food.  Or anything that involves cheese.  So, on Friday when I was searching my brain for something fun to cook, I came across a recipe in boyfriend's Barbecue cookbook (Barbecue by Eric Treuille & Birgit Erath).  This doesn't seem to be available in the US (going by the fact that it's only on amazon.co.uk, and not on amazon.com), but it's a great cookbook since there is a wide range of recipes for the grill and sides to go with it.  Most recipes also include instructions for indoor grilling too, which is nice.

So here's their recipe with my own modifications.


Spiced Beef Fajitas with Salsa and Guacamole
Marinade
2 garlic cloves, crushed
1/2 t crushed chili (recipe called for flakes, but I used hot chili powder)
1/2 t ground cumin
1/2 t dried thyme (recipe called for oregano, but I didn't have any)
1/4 t ground allspice (I used garam masala instead. I'd recommend allspice)
2 T Mexican beer, or lager (I used XXXX Summer Bright Ale)
1 T olive oil

Meat
2 thick (2.5 cm/1" thick) steaks (recipe calls for rump steak, I used porterhouse)

Guacamole
1 ripe avocado
2-3 t chili paste (fresh chilies would probably be better)
2 t dried coriander (fresh would be better)
fresh lemon or lime juice ( ~2T)
1-2 T fresh chili paste
1 green onion, finely chopped
1 T olive oil
salt & black pepper

Salsa
2 fresh (field) tomatoes, chopped
1/2 large red onion
1-2 T lemon or lime juice
white balsamic vinegar (a splash or two)
olive oil

Fajita
Flour tortillas
Sour Cream
Grated Cheese
(Shredded lettuce)

Marinating the Steaks
  1. Combine all ingredients for marinade in a shallow bowl.
  2. Add steaks, turn to coat.
  3. Cover (with saran wrap) and refrigerate for ~1 hour.
Guacamole
  1. Place roughly chopped garlic and green onion into a bowl, add a glug of olive oil and stir to combine.  Microwave on HIGH for 15-30 seconds.
  2. Add all other ingredients and mash to desired texture (recommend adding lemon/lime juice last).
  3. Season with salt and pepper to taste.
  4. Cover in saran wrap, pressing directly onto mixture to avoid contact with air (oxidized avocado looks unpleasant).
  5. Refrigerate for 30+ minutes (can be made well in advance and left in fridge).
Salsa
  1. Combine tomato, onion, vinegar, oil and lemon/lime juice in a small bowl, stir well to combine. 
  2. Cover in saran wrap and refrigerate.
Preparing the Fajitas
  1. Grill steaks to desired 'doneness' (I prefer medium-rare), then slice on the diagonal into stips (~1cm thick or as preferred).
  2. Warm tortillas on grill , ~30 second per side.  Alternately, place tortillas on a microwave safe plate and cover with a damp paper towel (cheesecloth works too), microwave on high 10-15 seconds.
  3. Put steak, guacamole, sour cream, cheese and salsa on tortillas  and season with S&P if desired.  Roll and serve hot.
Recommended additional ingredients - some people like lettuce on their fajitas (I don't).  Sauteed onions and peppers (capsicum) are also a favourite of mine on fajitas.

This is actually the first time I have ever made tacos or fajitas without using the Old El Paso spice packets. I was hugely impressed. I love the Taco seasonings, but I often find they are too salty. This had very little salt - only as much as I wanted to add, which was maybe 1/4 t in the marinade and another 1/2 t in the guacamole.  A much healthier alternative.

We made this recipe for two people, but there is actually probably enough marinade for four steaks.  We had two fajitas each from this and had a little meat leftover. Lots of leftover guacamole and a little leftover salsa too. I had the leftover salsa on toast with scrambled eggs for breakfast the next morning. It had a hugely strong flavour after sitting all night. I highly recommend.  

The guacamole and salsa recipes were mostly my own idea, somewhat inspired by the book.  I have difficulty following instructions, I like to go my own way :).  The green onions added a really nice extra bit of texture to the guacamole, and the salsa was a first for me - I really liked it and I think I'll try it again.  If made in a larger batch, I think a food processor would be the way to go. I hate cutting tomatoes.

I also think something like Corona or Sol would be good beers to use in the marinade but a) they're expensive and b) I don't like them and I knew I would be making the great sacrifice of drinking the leftover beer (how horrible) so I picked one that had a similar flavour that I actually enjoyed.   I think a spicy lager would have been good too.

Enjoy :D

Friday, August 26, 2011

Scotch Fillet with Salsa Verde Surprise and Fresh Spring Mashed Potatoes

Hi Folks,
I've been meaning all week to cook something worth putting up on the blog, but it's been a lazy cooking week.  Chicken salad and sweet potato fries are not exactly the most exciting of recipes to create or share (even if they are quite delicious).  So, today being Friday I decided it was time to create something fun and new.

To provide a setting for this meal I'll tell you that in Australia winter begins in June, and no, it's not quite as harsh as Canadian winters, but it's still cold, and instead of snow we get rain and hail and wind, and it calls for comfort foods.  Now, at the end of August, the weather is turning beautiful and it's feeling very much like spring time is just around the corner.  Or well, it feels like a Canadian summer :)  So I wanted to make something fresh and light that made me feel like springtime, and here you have it.


Scotch Fillet with Salsa Verde Surprise and Fresh Spring Mashed Potatoes
Salsa Verde Surprise
3-5 Fresh Strawberries
1 Avocado
1 Red Onion
Olive Oil
Balsamic Vinegar
a pinch white sugar
a pinch salt


Fresh Spring Mashed Potatoes
3 potatoes, peeled and chopped in large chunks
2-3 cloves garlic, peeled and finely chopped
2 green onions, washed and roughly chopped
2 T butter
Lemon Juice - 1/4 lemon or maybe 1-2 T lemon juice
Salt


Steak
  1. Place 2 steaks on a plate and splash liberally with balsamic vinegar and sprinkle with brown sugar, both sides.
  2. Allow steaks to sit at room temperature 10-15 minutes to absorb flavours.
  3. Barbecue steaks to desired level of 'done'ness.
Salsa Verde Surprise
  1. Heat frying pan to med-high with a splash of olive oil.
  2. Finely chop red onion and add to pan.
  3. Wash, hull and chop strawberries and place in a small bowl with 1-2T balsamic vinegar and 1/4 teaspoon white sugar, stir to combine.
  4. When onion is softened and beginning t change colour, add strawberry mixture to frying pan.
  5. Chop avocado into pieces similar in size to onion and strawberry.
  6. Remove strawberry and onion mixture from heat after ~5 minutes, combine in bowl with avocado, stir and add salt to taste.
Fresh Spring Mashed Potatoes
  1. Add peeled chopped potato to a large pot of cold water, add salt and bring to the boil.
  2. Boil potatoes for 15-20 or until soft.
  3. Heat oil in a pan, add garlic and green onion, cook until soft.
  4. Drain potatoes and put into a bowl, add butter in small chunks.
  5. Mash potatoes, add garlic, green onion, lemon juice and salt to taste.
Serve the avocado, strawberry and onion mixture on top of the steak.

Strawberries and avocadoes are both on sale here, which is awesome, because I love them and am always looking for excuses to buy them when they are in season.  The other day at the grocery store I saw scotch fillet steak on sale and I had a serious aha moment. While getting things ready for dinner I had some potatoes that needed eating and I was trying to figure out a way to make mashed potatoes that would suit the more fruity flavour of the steak and I remembered a clip from Masterchef a few years ago where they put spring onions into mashed potatoes and figured "Hey, I can maybe make something like that.... only less awesome."  So this is a completely original idea, that has been inspired by a whole bunch of other things.. so maybe not so original. I also found that we had a lot of leftover salsa verde... so these proportions could easily be used for 4 people. Or you could just eat the extra with a spoon :)  Also, I'm not entirely sure what salsa verde is, but it seemed the closest and easiest way to describe the 'mix of awesome' that I created.

The additional kick to this meal was two zucchini that I had chopped diagonally into ~1/4" thick slices and coated in olive oil and sprinkles with fresh sea salt and ground pepper and thrown on the barbecue. 


Turns out the whole meal was pretty awesome. The only complaint I have is that I tried to take pictures but the damn flash on my camera is broken so they look really unappealing.


Saturday, August 20, 2011

Slow-Cooked Lamb Rogan Josh

Another recipe I found from a food magazine, from the July 2011 issue of ABC's delicious magazine actually.  It was actually a full page advertisement for Patak's Rogan Josh, but either way it was easy and delicious.  Not to mention, slow cooker curry smells so incredibly good it makes me drool.  Another fun part of this recipe was discovering ingredients I've never used before, like curry leaves and cardamom pods.  I had never heard of curry leaves before!  As always, I had to reduce the recipe because my slow cooker is 'mini' sized.  I'll include the original recipe and my substitutions

Slow-Cooked Lamb Rogan Josh

2 T Sunflower oil (I used extra virgin olive oil)
1.5kg diced lamb shoulder (I used.... ~700g cubed lamb)
2 onions (I used 1)
4 cm piece ginger, grated (I acutally used ~3t ginger paste)
2 garlic cloves, finely chopped
1/2 cup (150g) Patak's Rogan Josh Paste
2 T tomato paste
400g can chopped tomatoes
1 cup (250mL) beef stock (I always have veg stock cubes handy)
2 cinammon quills
6 cardamom pods, lightly crushed
20 fresh curry leaves
200 g thick Greek-style yogurt
Steamed rice and naan bread, to serve. 


  1. Heat oil in pan over med-high heat, cook lamb for 3-4 minutes, turning until browned.  Put meat in slow cooker
  2. Cook onion, ginger and garlic in pan over med heat for 1-2 minutes, stirring frequently.
  3. Add Rogan Josh paste and tomato paste, cooking for ~1 minute.
  4. Add tomato and stock, bring to a simmer then pour into slow cooker. (Hey, this was a messy step!)
  5. Add spices and most of the curry leaves to the slow cooker, add S&P and/or other spices to taste. 
  6. Cook on low 6-8 hours (or high for 4) until reduced and thick.
  7. To serve: garnish with remaining curry leaves, serve with yogurt, rice and naan.  Serves 4?
Ok so some notes on this recipe. It was awesome, but because of the way I played with the recipe, it was a very strong tomato flavour (read: acidic) which is something to consider.  Also, the cardamom pods?  Don't eat them.  If you have the misfortune to chomp down on one... it tastes kind of like burning and lysol.  Yet, they add such a delightful flavour to the food.  Treat them like bay leaves and try to remove them before serving.

The great thing about this recipe is that, aside from the lamb, most of the ingredients are things I would have around the house anyways. Boyfriend loves curries, so we usually have at least one open and one unopened jar of some kind of curry paste, whether it's a Butter Chicken, a Rogan Josh, a Madras or whatever.  And yes, it's usually Patak's.  The curry leaves here are great;  I'm usually wary of buying 'exotic' ingredients because I never know what else to do with them, but I've been adding them to food here and there, and they have been sitting in the fridge for about a month now and don't look like they're going bad yet.  Which is a mighty bonus.   The leftover cinammon sticks I plan to use for mulled wine, so that's a win too.  I always like a recipe where the leftover ingredients can still be useful.

I suppose it's a bit weird to be posting all these slow cooker recipes in August, but it's winter where I am and these are great winter comfort foods.


McCormick Beef & Red Wine Casserole

There is nothing quite as delicious smelling as, well, anything in a slow cooker.  A month or two ago, boyfriend and I purchased our first slow cooker at Target. It's a tiny little thing, only makes 2-4 servings (depending on how hungry you are), but that's just fine for the two of us.  I've had a lot of fun figuring things out with it, with moderate successes.  I found that ad-libbing things in the slow cooker can have mixed results.  The curries were good, but the vegetable soup I tried was not so much.

To this effect, yesterday I decided to try a packaged sauce for slow cooker foods.  McCormick's Beef & Red Wine casserole.  I can't even begin to describe how delicious it smelled, and despite making some considerable modifications to the recipe, it tasted amazing.  I'm sorry, but I can't stand cooked celery... so I made some substitutions.  Here's the recipe I made, based on the package recipe.

McCormick Slow Cookers Beef & Red Wine Casserole

~600 g cubed beef (chuck or blade)
1 medium onion, peeled and sliced
1 carrot, peeled and sliced
2 cloves garlic, peeled and roughly chopped
6-8 button mushrooms, rinsed and thickly sliced
1x400g  sachet McCormick Slow Cookers Beef & Red Wine Sauce
1 cup red wine (I used a Wyndham Estate Bin 999 Merlot, it was on sale)
a splash water, for extra liquid
1-2 bay leaves, rinsed
Potatoes, peeled and cubed (to serve casserole on)

Casserole
  1. Brown beef on high, put in slow cooker.
  2. Sautee onions until clear and soft, add to slow cooker
  3. Add carrots, mushrooms, garlic to slow cooker
  4. In measuring cup (or glass of any sort I suppose) mix wine and sauce sachet, pour into slow cooker, stir to combine all ingredients. 
  5. Add bay leaves.
  6. Cook on high 4 hours or low 6-8 hours.
To serve

  1. Add peeled and cubed potatoes to sauce pan full of cold water
  2. Bring to boil, cook 15-20 minutes, until texture is as desired.
Serve casserole over warm potatoes.  I highly recommend having the rest of the wine with your dinner, but boyfriend also enjoyed a warm Porter (beer) with his.  The texture of this, while having more liquid (and less beef, onions, carrot) than the recipe called for was excellent, there was a bit of sauce, but it wasn't 'liquidy'.